Welcome to Power Automate Troubleshooting Guide!
Ever found yourself stuck in the middle of an important flow, scratching your head over why it’s not working? We’ve all been there. Whether you’re a seasoned pro or just starting out, running into issues with Power Automate can be frustrating. But don’t worry – this comprehensive Common Power Automate Issues guide is here to help you navigate and resolve the most common problems. Let’s dive in and get those flows running smoothly again!

In today’s fast-paced world, who doesn’t love saving time and cutting out tedious tasks? That’s where Power Automate steps in, like a trusty sidekick, to streamline your workflows. This powerful tool helps you automate repetitive processes, ensuring that you can focus on what really matters. Whether it’s sending automatic emails, syncing files, or managing approvals, Power Automate makes your work life smoother and more efficient. It’s like having an extra pair of hands that never gets tired!
We’ve all been there – you’ve meticulously set up your Power Automate flow, eagerly hit the save button, and watched in anticipation as it kicks off. But then, instead of the smooth automation you envisioned, you’re greeted with an error message or, even worse, silence. It’s like planning the perfect party and no one shows up. The frustration is real! You might feel like pulling your hair out, especially when you’re on a tight deadline. But before you let the stress take over, take a deep breath. This guide is here to help you turn those headaches into victories, step by step.
Common Issues and How to Fix Them
Issue 1: Flow Not Triggering
When Your Flow Refuses to Start.
Ever set up a flow and wondered why it’s not kicking off? It might be your trigger conditions playing hard to get. Trigger conditions are like the gatekeepers of your flow – they decide when it’s time to start the party. If these conditions aren’t set up just right, your flow will sit quietly, waiting for the perfect moment that might never come. Think of them as the bouncers at a club; if your conditions aren’t met, nobody’s getting in. So, take a moment to review them. Ensure they’re aligned with the exact criteria you need to kickstart your automation. Sometimes, a tiny tweak can make all the difference and get your flow moving!
Verify Connection Status
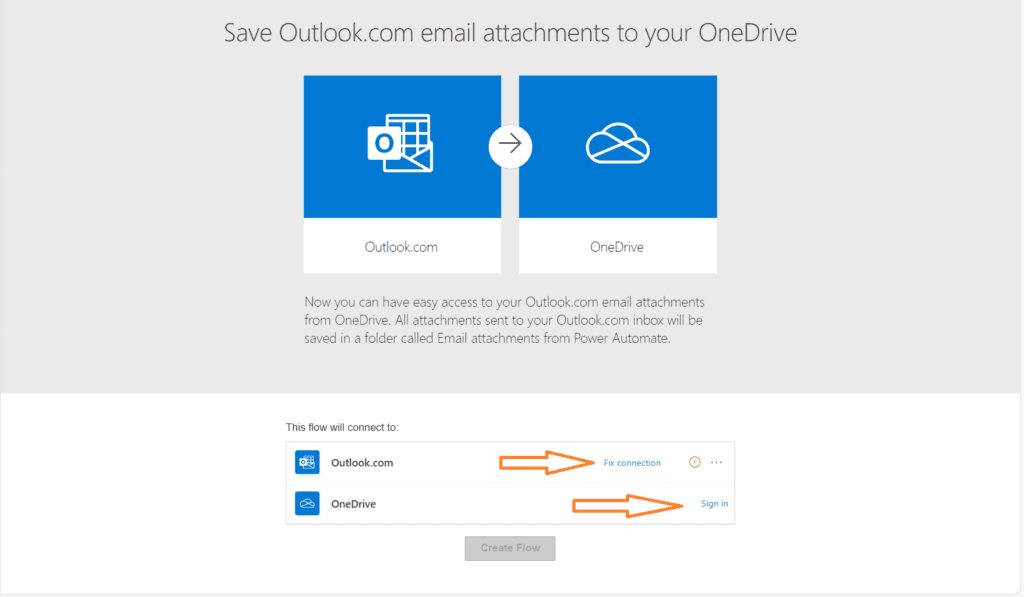
you’ve set up an amazing flow that’s supposed to make your life easier, but it’s just not working. One common culprit? Connection issues. It’s like trying to make a call without any signal. First things first, head over to the Power Automate portal and check your connections. Make sure each one is active – look for any red warnings or prompts that need your attention. If something seems off, click on the connection to reauthenticate. Sometimes, permissions might need a little nudge, so go ahead and reauthorize those too. A quick reauthentication can work wonders, getting your flow back on track in no time!
Check Your Trigger Conditions.
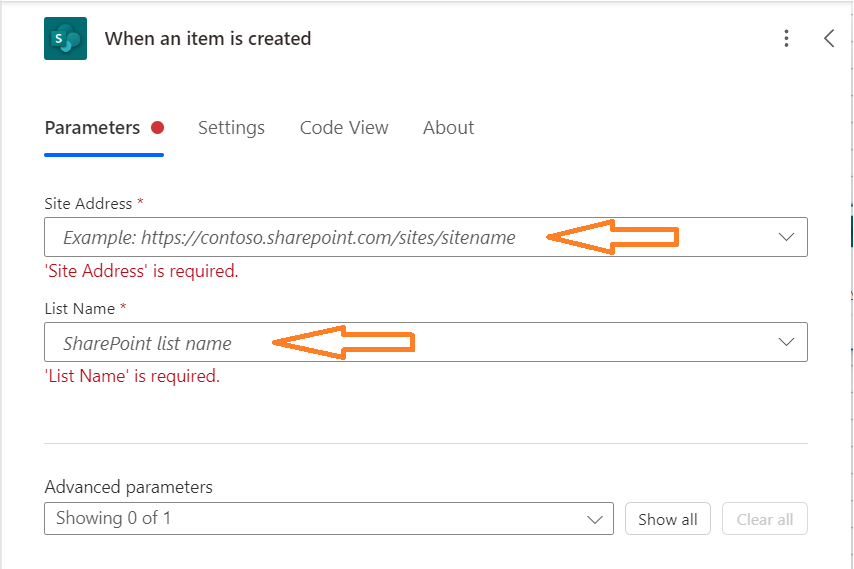
1. Verify Trigger Settings:
- Open your flow in Power Automate.
- Navigate to the trigger action at the top of your flow.
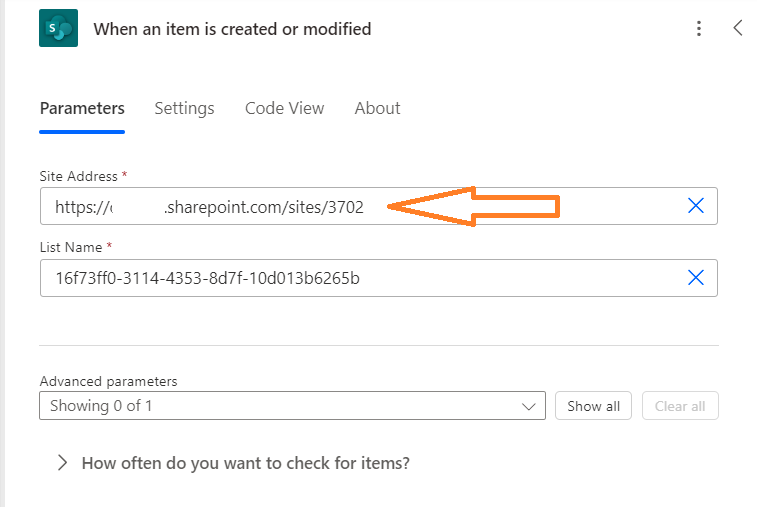
- Ensure the correct settings and parameters are configured for the trigger.
2. Review Trigger Conditions:
- Check if there are any conditions set for the trigger.
- Ensure the conditions match the criteria you expect to initiate the flow.
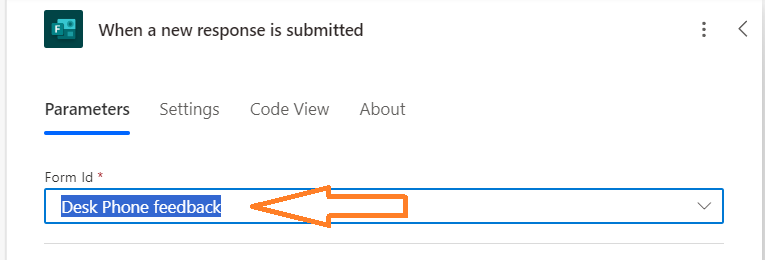
3. Examine Data Inputs:
- Make sure the data required to trigger the flow is available and correctly formatted.
- Validate that the data input meets all the conditions specified.
4. Check Connection Status:
- Confirm that the connections associated with your trigger are active and authenticated.
- Reauthenticate any connections that show errors or warnings.
5. Monitor Trigger Limits:
- Be aware of any limits or restrictions on the trigger, such as frequency or API call limits.
- Adjust your flow to accommodate these limits if necessary.
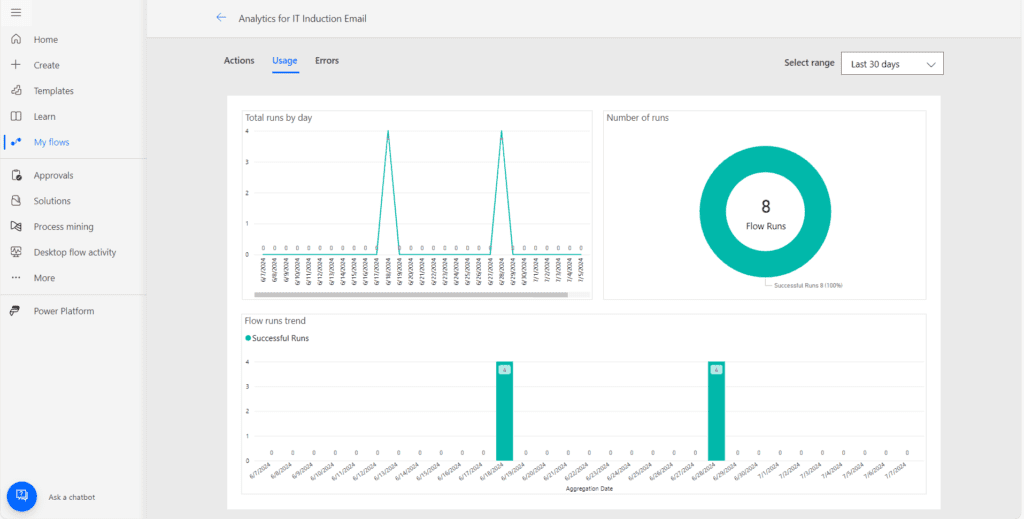
- Click on “Analytics” to view detailed information about the flow’s performance and trigger history.
- In the Analytics section, you’ll see metrics and logs related to the flow’s runs.
- Focus on the trigger history to see how often the trigger has fired and any related limits.
6. Test the Trigger
- Manually trigger the flow if possible to ensure it activates correctly.
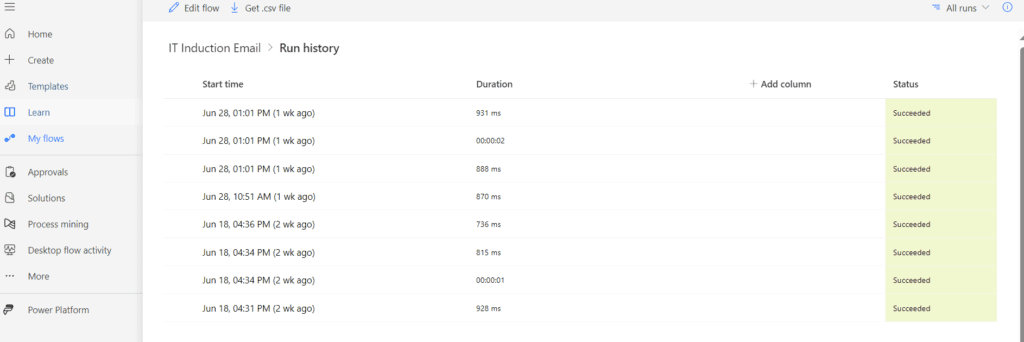
- Review the flow run history to see if the trigger fired as expected and to identify any issues.
Issue 2: Action Failing
Handling Action Failures Like a Pro
Review Action Configuration : Flow builder! Sometimes, a small mistake in action settings or parameters can cause your flow to misbehave. Let’s make sure everything is set up correctly. Here’s a simple checklist to help you double-check your action settings and parameters:
1. Review Each Action Step
- Go through your flow step-by-step. Click on each action to open its settings panel. Think of it as giving your flow a mini health check-up.
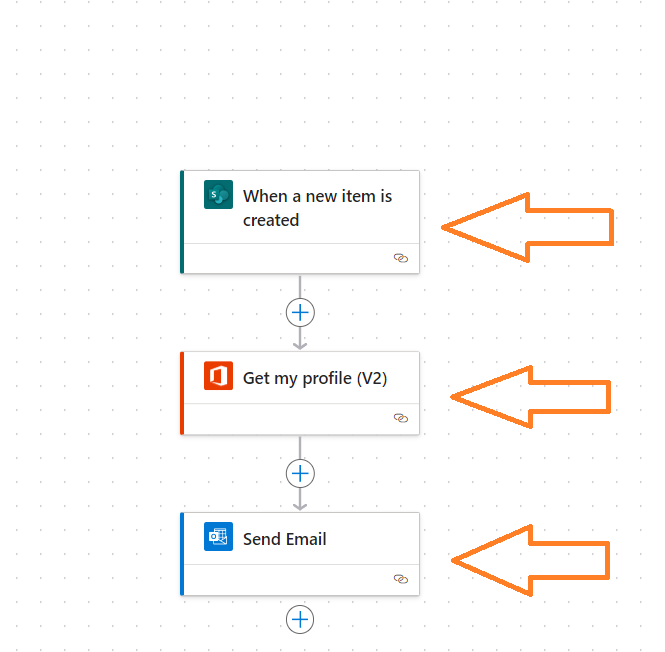
2. Check Action Configurations
- For each action, verify the configurations. Ensure you’ve selected the correct triggers, connectors, and actions. Sometimes, it’s easy to accidentally pick the wrong one from a dropdown menu.

3. Validate Parameters
- Look at the parameters for each action. Make sure the values entered make sense and are formatted correctly. For example, if you’re entering dates, confirm they’re in the right format (MM/DD/YYYY or DD/MM/YYYY, depending on your locale).
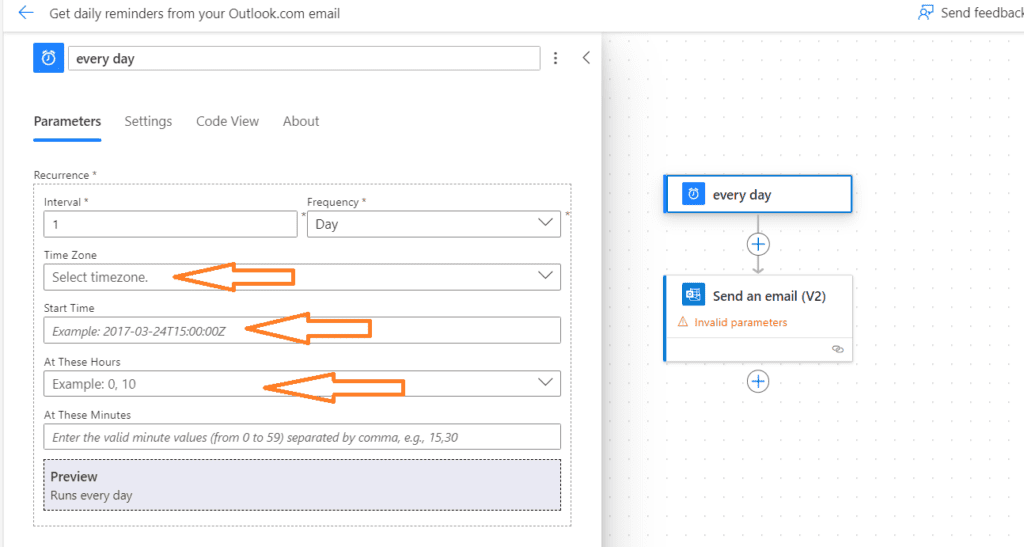
4. Confirm Field Mappings
- Double-check the field mappings, especially if you’re pulling data from one action to use in another. Ensure that the right data fields are being referenced.
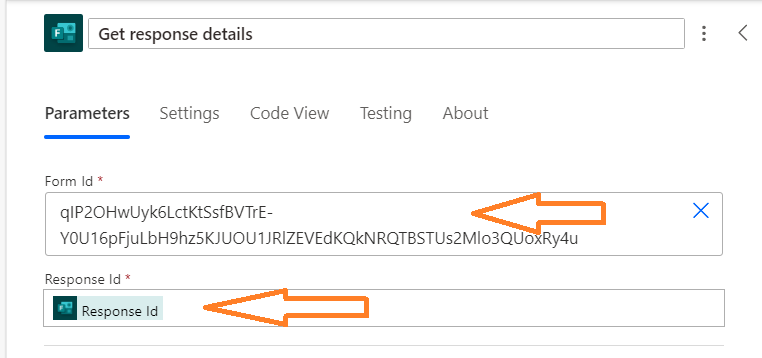
5. Test Dynamic Content
- If you’re using dynamic content, make sure it’s pulling in the correct data. Click on the dynamic content tokens to see a preview of the data they’ll pull in. This step is crucial for avoiding mismatches and errors.
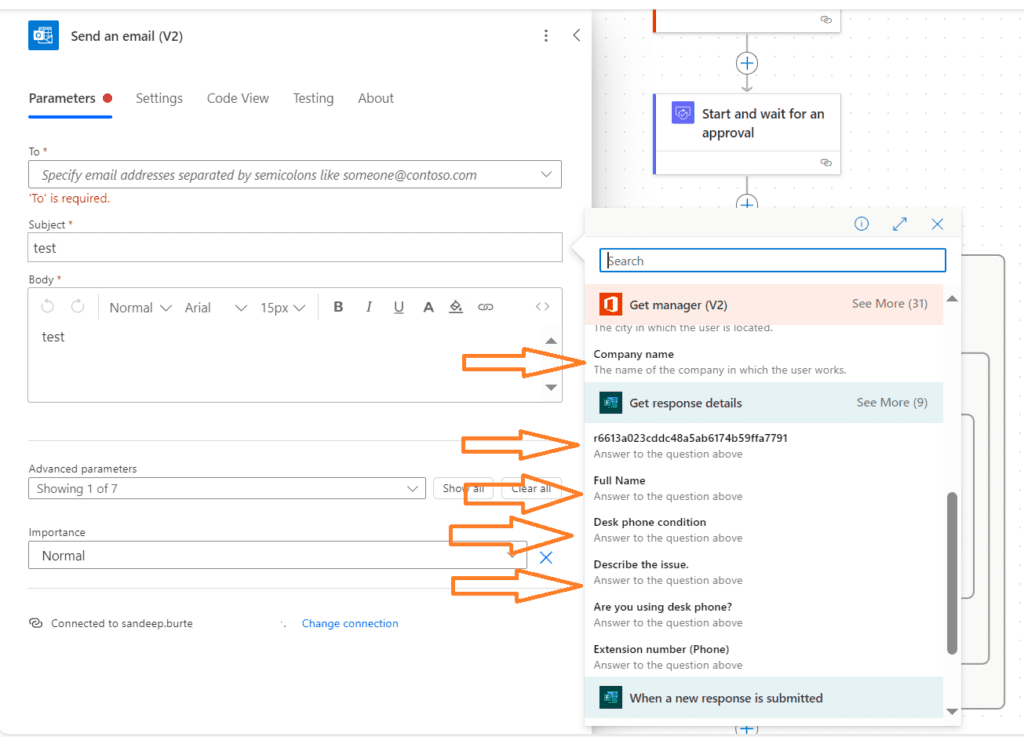
6. Check for Required Fields
- Ensure all required fields in each action are filled out. Missing a required field is like trying to bake a cake without flour – it just won’t work!
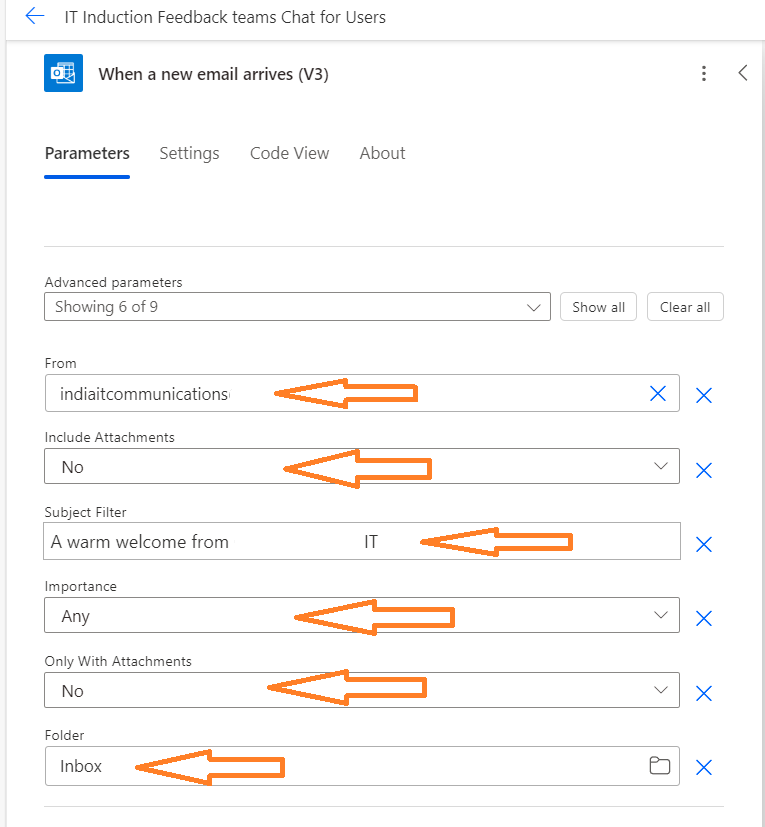
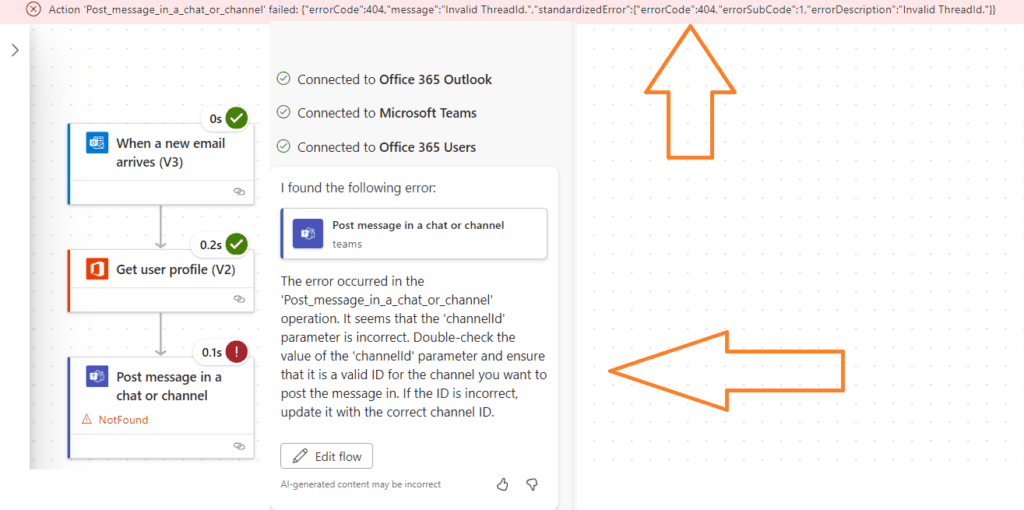
7. Look for Error Messages:
- As you review each action, keep an eye out for any error messages or warnings. Power Automate is pretty good at flagging issues, so don’t ignore those little red exclamation marks!
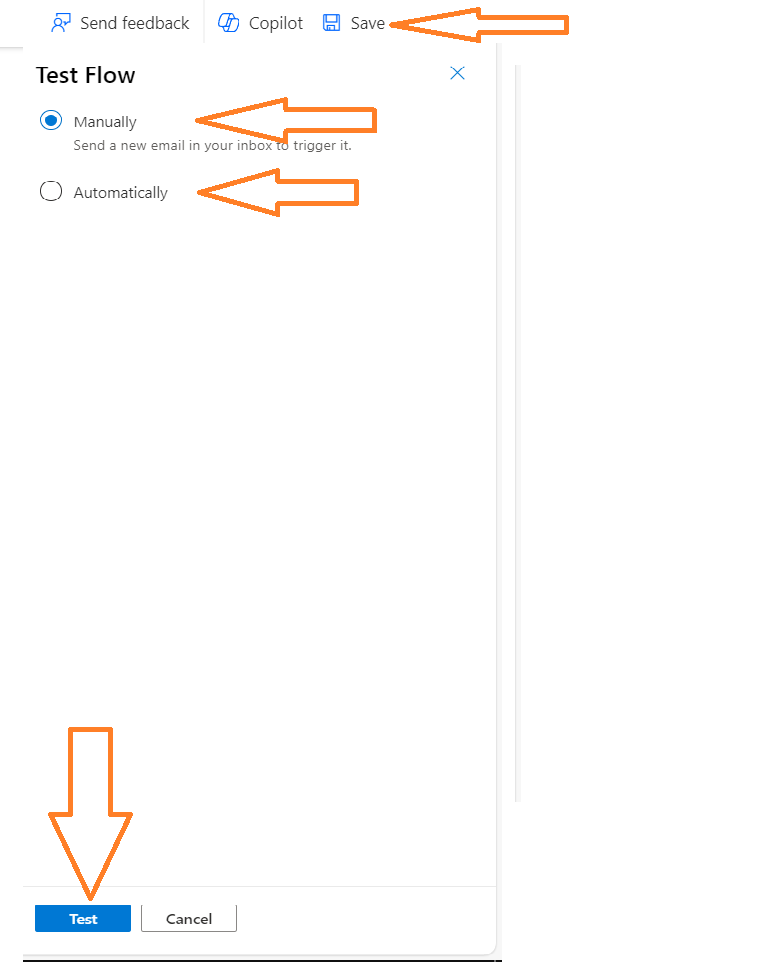
8. Save and Test
- After you’ve reviewed all the settings and parameters, save your flow. Then, run a test to see if everything works as expected. Testing is your safety net – it catches any remaining issues before they cause real problems.
Issue 3: Approval Workflow Stuck
Getting Your Approval Flow Moving Again
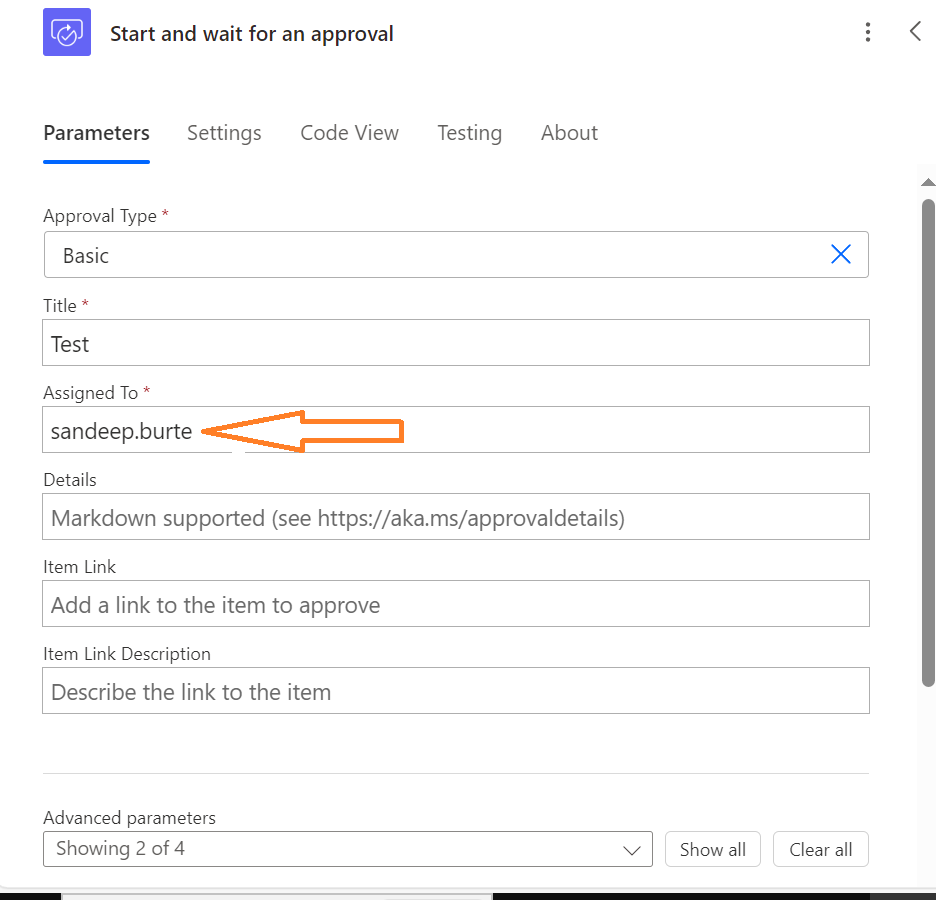
1. Verify Approver Email Addresses
Imagine you’ve set up a sleek approval flow in Power Automate, but the approvals aren’t going through. Often, the culprit is incorrect email addresses. Having the correct email addresses in your approval flow is crucial – it’s like ensuring the mailman knows the right house to deliver to. If the email address is wrong, your approval request might end up in the digital equivalent of the Bermuda Triangle. To fix this, go into your flow, navigate to the approval action, and double-check the email addresses you’ve entered. If you spot any errors, simply update them with the correct information. Click on the action, edit the email field, and make sure to save your changes.

2. Check for Pending Approvals
Stuck approvals can be a real headache, but don’t worry – we’ll get things moving again. Here’s how you can identify and resolve those pesky pending approvals blocking your workflow:
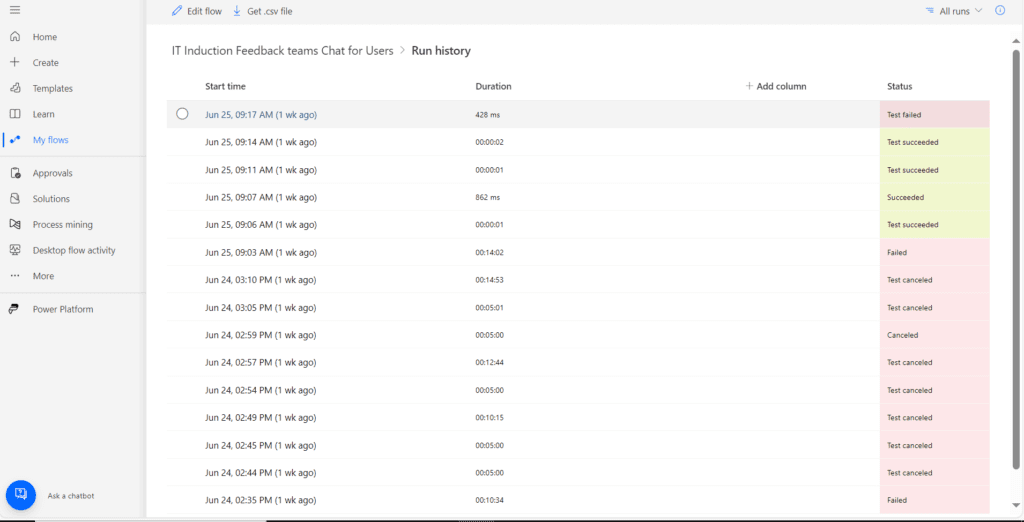
1. Open the Run History
- Go to the flow’s details page and click on the “Run History” tab. This is where you can see all the past and current runs of your flow. Think of it as your flow’s diary – it records everything!
2. Identify Pending Approvals
- Look for any runs marked with a status like “Running” or “Waiting for Approval.” These are the ones we need to focus on. Click on these runs to dive into the details.
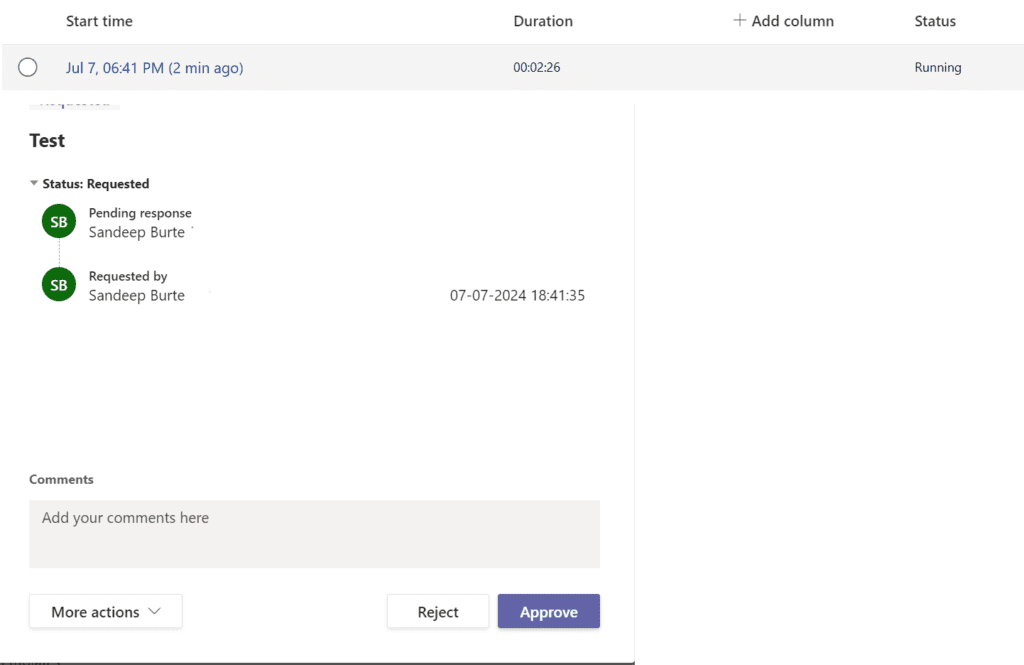
3. Check Approval Status
- Within the run details, find the approval action. Here, you can see who the approval request was sent to and whether it’s still pending. If it’s hanging out in “Pending” status, we’ve found our bottleneck!

4. Contact Approvers
- Reach out to the approvers directly. A gentle reminder can go a long way. Sometimes, emails get lost or forgotten, so a quick nudge might be all that’s needed.
5. Reassign Approval
- If the original approver is unavailable or unable to respond, you can reassign the approval to someone else. Open the approval action in your flow, click on the “Reassign” option, and enter the new approver’s email address. Make sure to save your changes!
6. Resend Approval Request
- If needed, you can resend the approval request. Go to the pending approval in your run history and click on “Resend.” This sends the approval request again, just in case it was missed the first time.
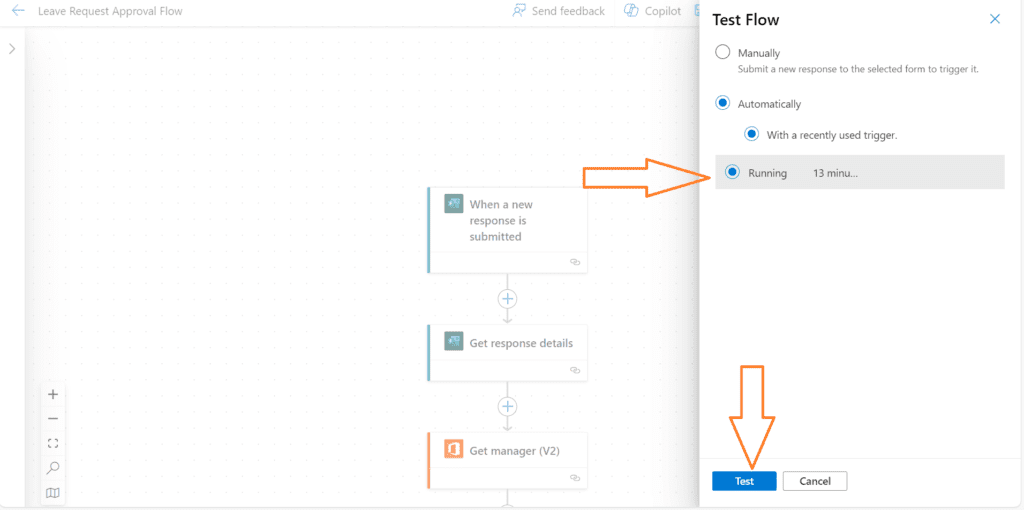
7. Monitor and Follow Up
- Keep an eye on your flow’s run history for any new pending approvals. Regular monitoring and timely follow-ups can help keep your workflow running without interruptions. If you want to learn more about Approval Flow visit
Issue 4: Connection Errors
Fixing Those Pesky Connection Issues
Dealing with connection issues in your Power Automate flow can feel like trying to untangle a bunch of knotted cables – frustrating and time-consuming. But don’t worry, it’s usually easier to fix than it seems! First, double-check that all your connections are active and authenticated. Sometimes, they might lose their authorization, especially if passwords change or permissions are updated. Head to the connections tab in Power Automate, and look for any that have a warning or error icon. Click on them to reauthenticate – it’s like giving your flow a quick refresh. If you’re still having trouble, ensure that the necessary permissions are granted.

1. Reauthenticate Connections
- Navigate to Connections: On the left-hand menu, click on “My Flow,” then select “Your flow which you want to change connection.” After that you will see connection option at the right side window, This is your hub for all the links that keep your flows humming along.
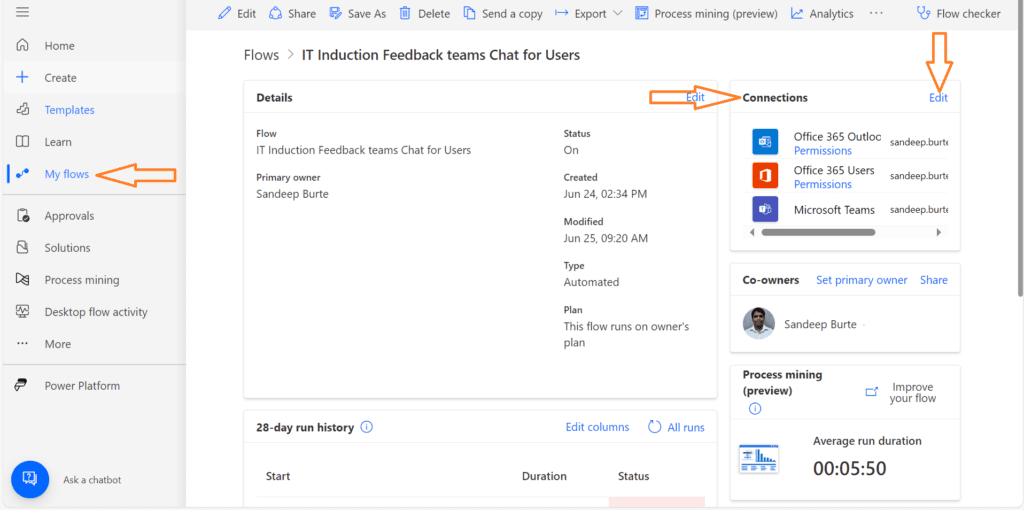
- Identify Troubled Connections: Look for any connections with a warning icon (a little yellow triangle) or an error message. These are the ones that need your attention.
- Reauthenticate the Connection: Click on the connection that needs reauthentication. You’ll see an option to “Fix connection” or “Reauthenticate.” Click on that, and a prompt will guide you through re-entering your credentials. Think of it like giving your connection a friendly nudge to wake it up.
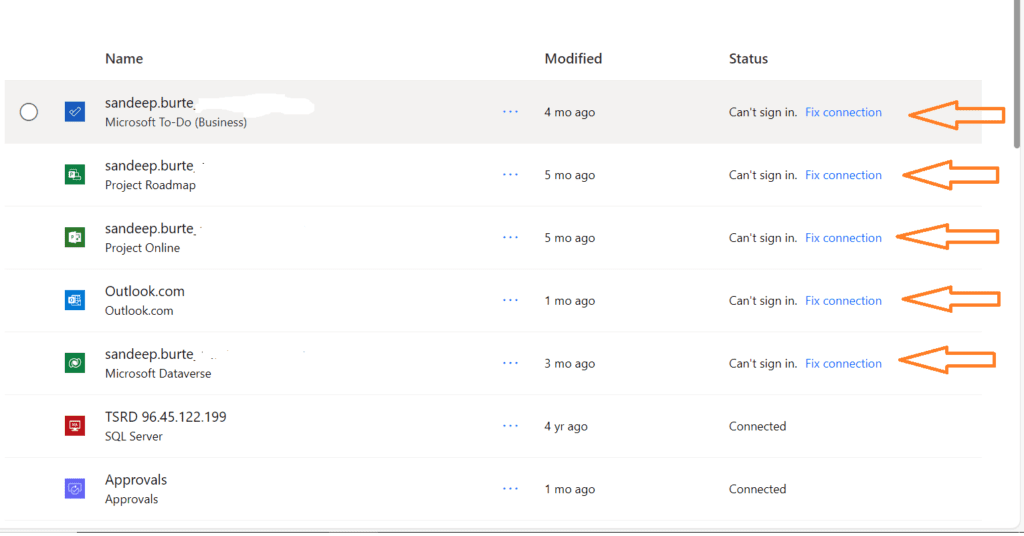
- Follow the Prompts: Enter the necessary credentials – usually your M365 email address and password for the connected service. Make sure you grant all requested permissions to keep everything running smoothly.

- Repeat for Other Connections: If you have multiple connections that need attention, repeat the steps above for each one. It’s like a little spring cleaning for your flow.
- Test Your Flow: Once you’ve refreshed all the necessary connections, run a test flow to ensure everything is working as it should. It’s always good to double-check!
- Monitor for Future Issues: Keep an eye on your connections from time to time. Regular checks can help you catch and fix issues before they disrupt your workflows.
2. Update Permissions
Imagine you’ve set up a fantastic Power Automate flow, but it’s stumbling at the finish line because of permission issues. It’s like having the perfect recipe but missing a key ingredient. To make sure your flow runs smoothly, you need to ensure that all necessary permissions are granted for your connections. Start by checking the permissions for each connected service – whether it’s SharePoint, Outlook, or any other app you’re using. Head to the connection settings in Power Automate and verify that each connection has the right level of access. This might mean full control for some services or just read/write access for others.

3. Check Service Status
Ever had your Power Automate flow suddenly stop working and wondered if it’s not you, but them? Sometimes, the issue isn’t with your flow but with the external services it depends on. To check if an external service is down, start by visiting the service’s status page. Most major services like SharePoint, Outlook, and OneDrive have dedicated status pages where they post updates about outages and maintenance. Just type “[Service Name] status” into your favorite search engine, and you’ll usually find the right page. Another great resource is DownDetector, a website that tracks outages for a variety of services and provides real-time reports from users.

Issue 5: Data Formatting Problems
Solving Data Formatting Headaches
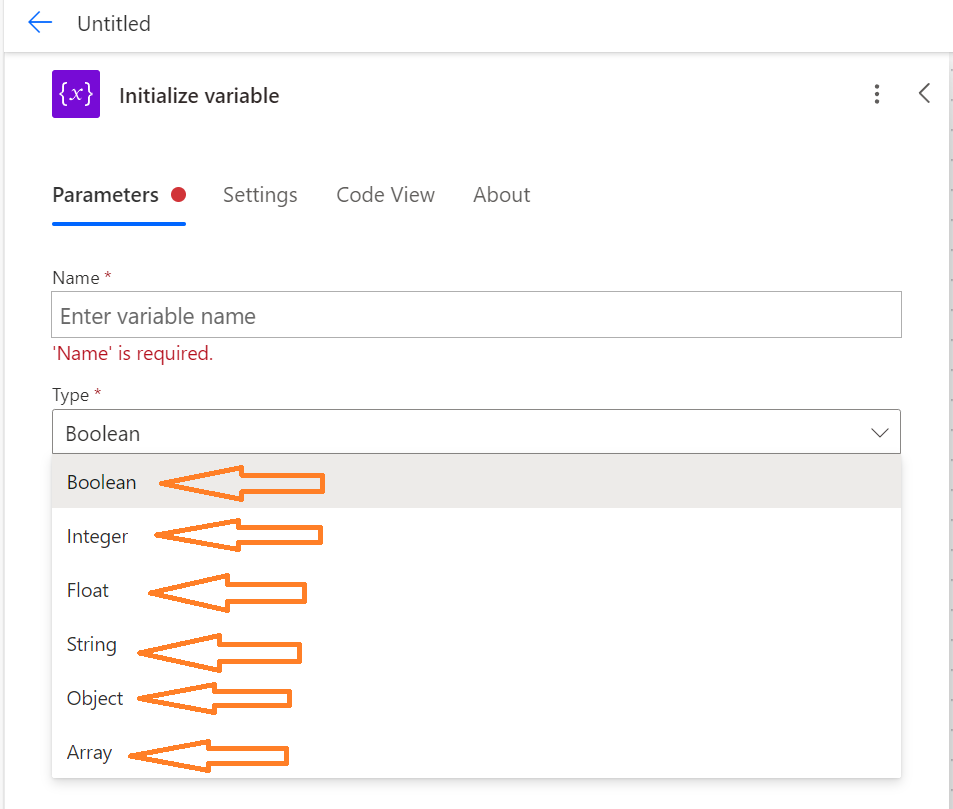
In Power Automate, you’ll come across various data types such as Strings, Float, Integers, Booleans, Arrays, and Objects. Strings are basically text, like the name of a customer or a message in an email. Integers are whole numbers, perfect for things like counting items or calculating totals. Booleans are true/false values, great for setting conditions like “Is this task completed?” Arrays are collections of items, like a list of email addresses, and objects are complex data structures that can hold multiple properties, like a customer record with a name, email, and phone number. float variable is used to store decimal numbers, making it ideal for calculations requiring precision, such as financial data or measurements. Knowing which data type to use is crucial because it ensures that your flow handles information correctly, avoids errors, and runs smoothly.
Apply Data Conversion Actions
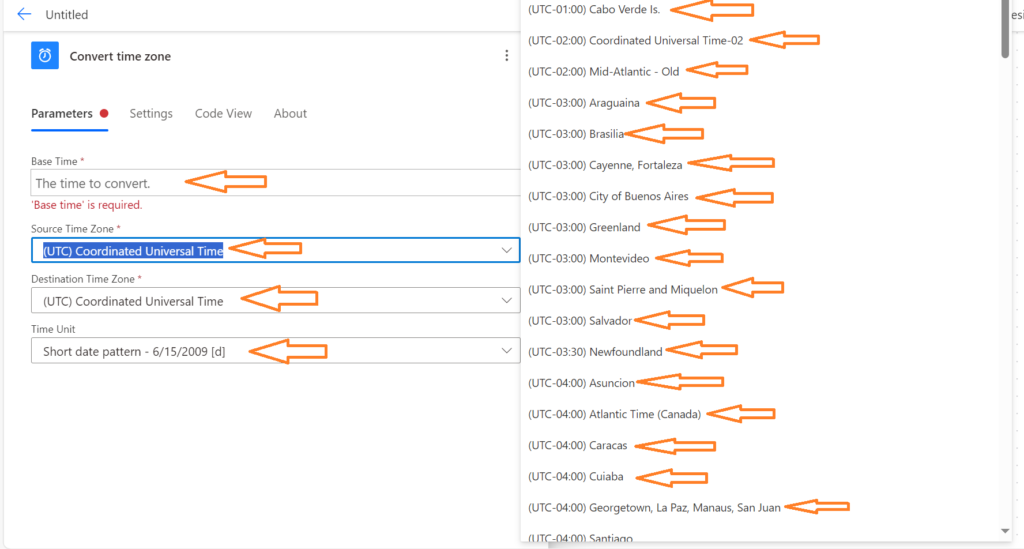
Ever needed to adjust time zones or format numbers just right in your Power Automate flows? It’s easier than you think! Use the “Convert Time Zone” action to seamlessly switch between different time zones – perfect for coordinating across global teams. Just specify the Base Time, Source time zone, Destination time zone, and let Power Automate handle the rest. For numbers, the “Format Number” action is your best friend. Whether you need to round off decimals or add currency symbols, this action ensures your data looks polished and professional. Simply select your number, choose the desired format, and watch your data transform!
Validate Input Data
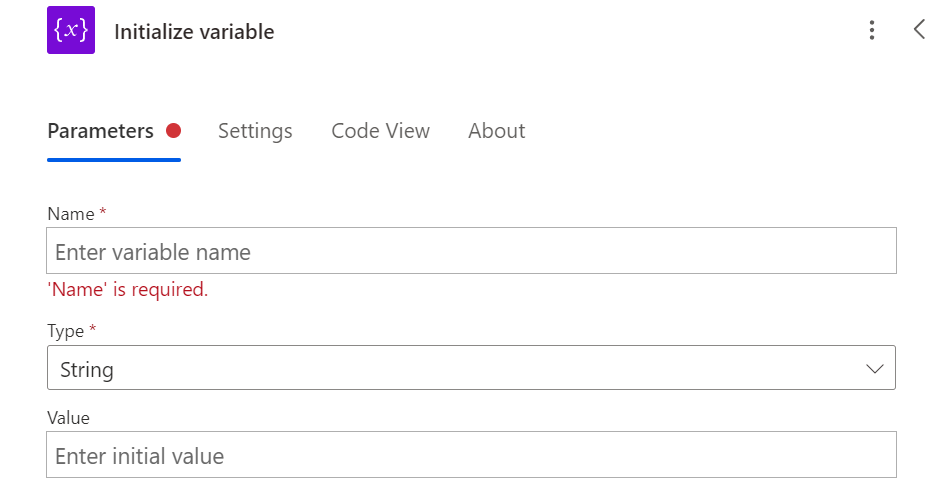
Let’s talk about avoiding those pesky formatting issues in your Power Automate flows. Validating incoming data is key! Start by using the “Initialize Variable” action to set expected data types, like strings, numbers, or dates. This helps ensure your data fits the format you need. Also, add a “Condition” action to check if the incoming data meets your criteria before the flow continues. If something doesn’t match, you can handle it gracefully by sending an alert or logging the issue. These small steps can save you a ton of troubleshooting time and keep your flows running smoothly!
Getting Past the Pain Points: Advanced Troubleshooting Tips for Power Automate
We all know that feeling when a flow just won’t cooperate, and you’re left scratching your head. Don’t worry – we’ve got some advanced troubleshooting tips to help you power through those tough spots and get your flow back on track.
Going Beyond the Basics
1. Utilize the Flow Checker
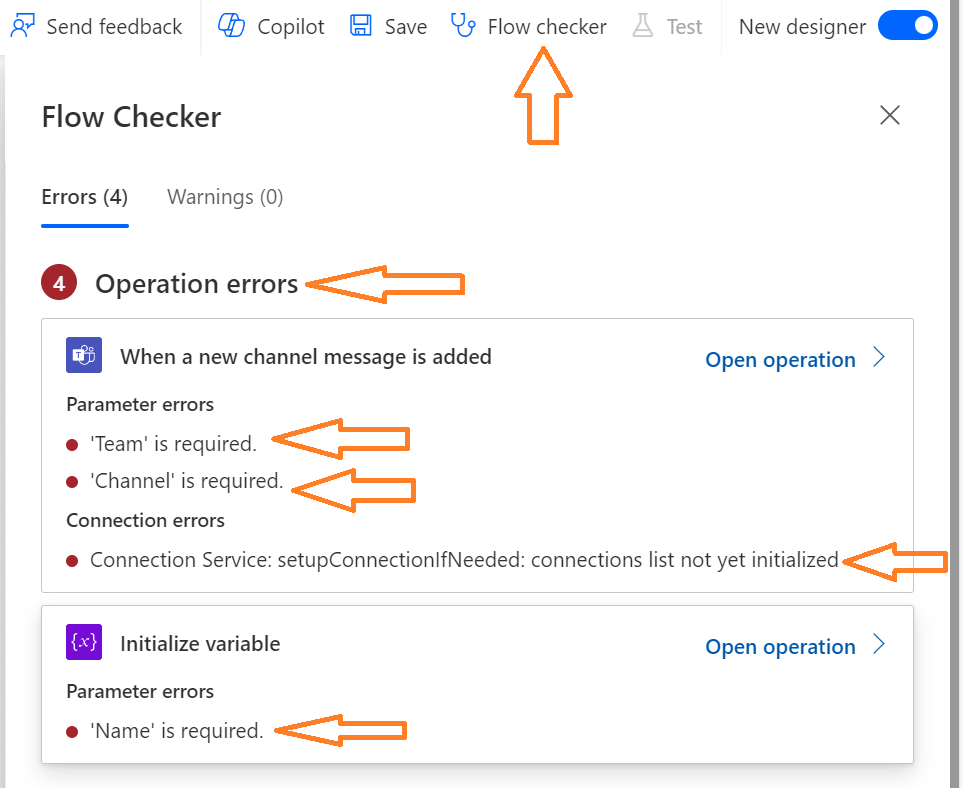
Running into snags with your Power Automate flow? The built-in Flow Checker tool is your new best friend. Think of it as having a personal mechanic for your flow, ready to diagnose issues and suggest fixes. To get started, open your flow in the Power Automate portal. You’ll see a little icon that looks like a stethoscope at the top right corner – that’s the Flow Checker. Click on it, and watch it work its magic. The Flow Checker scans your flow for errors and warnings, pinpointing exactly where things might be going wrong. It’s like having a GPS that guides you straight to the problem spot. Once it lists the issues, click on each one for detailed information and suggestions on how to fix them. Sometimes it’s a missing parameter, an incorrect expression, or a connection issue – the Flow Checker will help you spot it. By using this handy tool, you can quickly troubleshoot and refine your flow, ensuring it runs smoothly. So next time you hit a bump, give the Flow Checker a try and get back on track in no time!
2. Dive into the Run History
Sometimes, the devil is in the details. Open the run history of your flow to see exactly where things went wrong. Each run has a detailed log, showing which steps succeeded and which failed. This can help you pinpoint the exact step causing trouble and understand why it failed. if you won’t sure hot to find run history read this detailed article
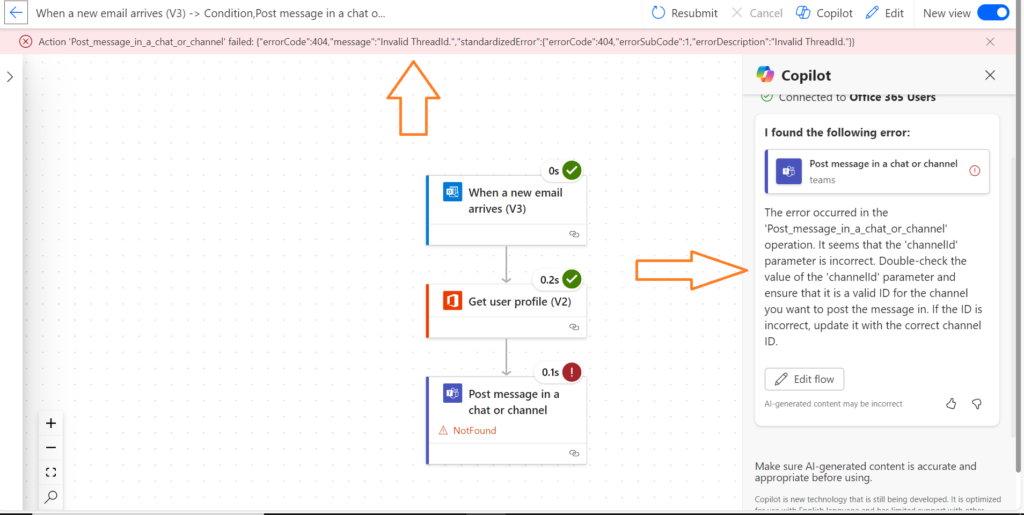
3. Use Scope Actions for Better Visibility
Group related actions into Scopes. This not only makes your flow more organized but also helps you isolate issues. If a Scope fails, you can drill down to see which specific actions within it are causing the problem.
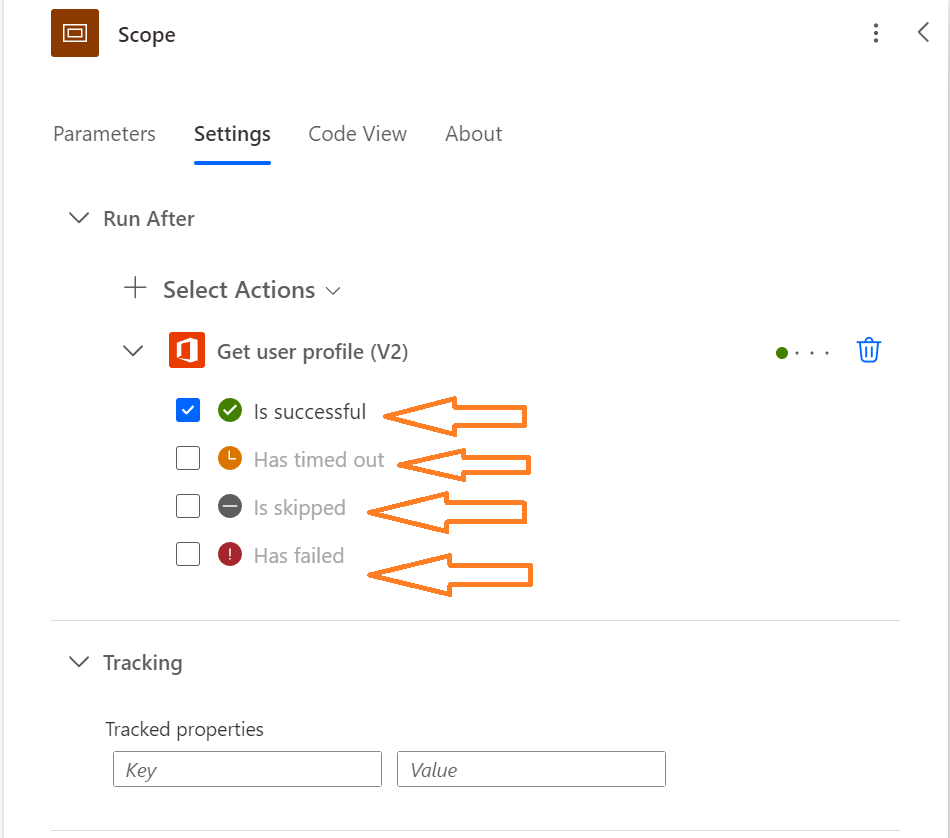
4. Enable Detailed Logging
Turn on detailed logging for your flow. This can provide more insights into each action’s execution, helping you understand what’s going on behind the scenes. You can find this option in the settings of your flow.

5. Check for Connector Limitations
Each connector has its own set of limitations and quotas. Make sure your flow isn’t hitting these limits. For instance, some connectors have limits on the number of API calls per minute. Understanding these limits can help you adjust your flow accordingly.
You’re Now Ready to Tackle Power Automate Issues
One of the best things about Power Automate is the endless possibilities it offers. Don’t be afraid to dive in and start experimenting – it’s the key to mastering this powerful tool. Try creating different types of flows, play around with various connectors, and see what happens when you tweak settings and conditions. Sure, you might hit a few bumps along the way, but that’s all part of the learning process. Every mistake is a stepping stone to becoming more proficient. And remember, there’s a whole community out there ready to help. Join forums, watch tutorials, and don’t hesitate to ask questions. The more you explore and experiment, the more confident you’ll become in automating your tasks and workflows. So, roll up your sleeves, have some fun, and discover all the amazing things you can achieve with Power Automate!
Additional Resources For Common Power Automate Issues
- Links to Tutorials: Microsoft Power Automate Documentation
- Community Forums: Power Automate Community
- Further Reading: Advanced Power Automate Techniques


